
The first time I bit into a steaming hot loroco pupusa, it was a revelation. Found at a bustling pupusería in San Salvador, the tender corn masa gave way to a burst of creamy cheese and the uniquely herbaceous, subtly floral flavor of loroco. It wasn’t just delicious; it felt like tasting El Salvador itself. Today, we unlock that magic in your kitchen. Welcome to your authentic, step-by-step guide to making the iconic Salvadoran loroco pupusa – a dish so cherished, UNESCO declared pupusas an Intangible Cultural Heritage of Humanity.
What is Loroco? The Star Ingredient Explained
Loroco (Fernaldia pandurata) is the edible flower bud of a vine native to Central America. Imagine the delicate vegetal notes of asparagus or green beans, kissed by a subtle floral undertone reminiscent of jasmine or magnolia, with a faint peppery finish. It’s truly unique and irreplaceable in authentic Salvadoran cooking.
- Appearance: Tiny, tightly closed green buds, about the size of a small pea.
- Flavor Profile: Herbaceous, floral, slightly earthy, with a mild tang. Cooking mellows its raw bitterness.
- Sourcing: Finding fresh loroco outside Central America can be challenging. Your best bets are:
- Latin American Grocers: Often carry it frozen (ideal!) or canned/jarred.
- Frozen: Preferred for better texture and flavor retention. Thaw before using.
- Canned/Jarred: More accessible but can be softer and sometimes brinier. Rinse well.
- Substitutes? Authenticity suffers, but in a pinch, combine finely chopped spinach (for color/texture) with a touch of chopped fresh parsley or cilantro and a tiny pinch of dried marjoram or tarragon (for a hint of floral). It won’t replicate loroco, but provides a green element.
- Cultural Value: Loroco is deeply woven into Salvadoran culinary heritage. Using it connects you directly to generations of Salvadoran cooks. Its unique flavor defines the beloved loroco pupusa.
A Taste of History: The Humble Pupusa’s Journey
Pupusas trace their roots back over 2000 years to the indigenous Pipil tribes of El Salvador. Originally simple corn cakes, the practice of stuffing them evolved over centuries. The name “pupusa” likely comes from the Pipil word “pupushawa,” meaning “swollen” – a perfect description! Traditionally cooked on clay comales, pupusas sustained communities and became a ubiquitous comfort food.
Types of Pupusas:
- Revueltas: The ultimate mix – cheese, beans, and chicharrón.
- Queso: Pure, melty cheese bliss.
- Frijoles: Savory refried beans, often blended with cheese.
- Loroco Pupusa: The cherished combination of creamy cheese and fragrant loroco buds, a celebration of Salvadoran flora.
They are more than sustenance; they represent resilience, family, and national pride. Making them is an act of preserving culture.
Gathering Your Authentic Loroco Pupusa Ingredients (Makes 8-10 pupusas)
For the Masa (Dough):
- 2 cups (approx. 250g) Masa Harina (Maseca brand is widely available and reliable – NOT cornmeal or regular corn flour)
- 1 3/4 – 2 cups (415ml – 475ml) Warm Water
- 1/2 teaspoon Salt
For the Loroco & Cheese Filling (Queso con Loroco):
- 8 ounces (225g) Quesillo or Queso Fresco (Salvadoran stringy melting cheese or fresh farmer’s cheese. See notes!)
- 4 ounces (115g) Prepared Loroco (Thawed if frozen, rinsed well if canned/jarred. Pat dry. If using fresh, clean thoroughly and chop roughly)
- 1/4 cup (60ml) Water or Milk (optional, for moisture)
- Pinch of Salt (Taste your cheese first!)
Essential Notes on Ingredients:
- Masa Harina is Key: This is nixtamalized corn flour, treated with lime, giving it the distinct flavor, aroma, and pliability needed for pupusas. Regular cornmeal or corn flour won’t work. Find it in the Latin aisle or online.
- The Cheese Conundrum (Authenticity vs. Accessibility):
- Authentic Choice (Quesillo/Queso para Pupusas): This salty, semi-soft cheese melts beautifully into strings. Find it in Latin markets.
- Best Substitute Blend: Combine 8oz shredded Oaxaca cheese (for melt) + 4oz crumbled Feta or Cotija (for saltiness). Avoid pre-shredded “Mexican blend” cheeses with anti-caking agents. Queso fresco alone is too crumbly and won’t melt properly.
- Prepping Loroco: Finely chop the prepared (thawed/cleaned) loroco buds. If using canned, rinse very well under cold water to reduce briney taste, then pat dry thoroughly before chopping. Excess moisture makes the filling leak.
Equipment:
- Large Mixing Bowl
- Skillet or Comal (cast iron or heavy non-stick preferred)
- Spatula
- Plastic Wrap or Slightly Damp Kitchen Towel
- Small Bowl of Water (for shaping)
- Optional: Tortilla Press lined with plastic (helpful for beginners)
Step-by-Step: Crafting Your Authentic Loroco Pupusa
Step 1: Prepare the Masa (Dough)
- In a large bowl, whisk together the masa harina and salt.
- Gradually add warm water, starting with 1 3/4 cups. Mix with your hands. The goal is soft, pliable dough that holds together without cracking, similar to Play-Doh. It shouldn’t stick excessively to your hands. Crucial Tip: Knead for 2-3 minutes. This activates the masa and improves texture. If too dry, add water 1 tablespoon at a time. If too sticky, sprinkle in a bit more masa harina. Cover tightly with plastic wrap or a damp towel and let rest for 10-15 minutes. This hydrates the masa fully.
Step 2: Make the Loroco & Cheese Filling (Queso con Loroco)
- Finely chop the prepared loroco buds.
- If using quesillo, tear it into thin strands. If using queso fresco, crumble it finely. If using the substitute blend (Oaxaca + Feta/Cotija), shred the Oaxaca and crumble the salty cheese.
- In a bowl, thoroughly combine the cheese and chopped loroco. If the mixture seems very dry (especially with drier cheeses like feta/cotija), sprinkle in 1-2 tablespoons of water or milk and mix. You want it to hold together slightly when pressed. Add a tiny pinch of salt only if needed (quesillo and feta/cotija are already salty). Set aside.
Step 3: Forming the Pupusas (The Art of the Seal)
- Moisten Hands: Keep a small bowl of water nearby. Dip your fingers to prevent sticking.
- Form a Ball: Take a golf ball-sized portion of masa (about 1.5-2 oz / 45-60g). Roll it into a smooth ball. Keep the remaining masa covered.
- Create the Well: Hold the masa ball in one hand. Use the thumb of your other hand to press into the center, rotating the ball to create a deep, even well or cup, leaving walls about 1/4-inch thick. Alternatively (easier for beginners): Flatten the ball slightly into a thick disc. Place it between two sheets of plastic wrap and press gently with a tortilla press or flat-bottomed dish to about 4 inches wide. Don’t press too thin!
- Add the Filling: Place 1-1.5 tablespoons of the loroco-cheese filling into the well or center of the disc. Don’t overfill! This is the #1 cause of bursting. The filling should be generous but contained within the masa borders.
- Seal the Deal: Carefully bring the edges of the masa up and over the filling. Gently pinch the edges together at the top to completely enclose the filling. Roll the sealed ball gently between your palms to smooth it out, ensuring no filling is exposed and the masa is even. Texture Check: The sealed ball should feel smooth, with no cracks or leaks. If you see filling, patch gently with a tiny bit of masa.
- Flatten Gently: Place the sealed ball between your palms. Apply even, gentle pressure, patting and rotating to flatten it into a disc, about 1/4 to 1/3 inch thick and 4-5 inches in diameter. Avoid: Pressing too hard or too thin, causing cracks or filling leakage. Thicker is better than too thin. Repeat with remaining masa and filling. Cover formed pupusas with plastic wrap.
Step 4: Cooking to Golden Perfection
- Heat the Comal/Skillet: Place a well-seasoned cast iron comal, griddle, or heavy non-stick skillet over medium heat. Get it properly hot – a sprinkle of water should sizzle and dance.
- Cook Dry First: Place a pupusa onto the hot surface. Cook for 2-3 minutes, until the bottom releases easily and has golden-brown spots. Aroma: You should smell the toasty corn aroma.
- Flip and Press (Gently!): Flip the pupusa using a spatula. It should have nice golden patches. Optional Traditional Step: Lightly brush the cooked top side with a tiny bit of oil or lard using a pastry brush or paper towel. Cook for another 2-3 minutes.
- Second Flip & Press: Flip again. Press down very gently around the edges with your spatula for about 15-20 seconds. This ensures even cooking and helps puff the pupusa slightly. Flip once more and press gently again for another 15-20 seconds. Total cooking time is usually 4-6 minutes per pupusa, depending on thickness and heat.
- The Signs of Doneness: The pupusa should be cooked through with a slightly crisp exterior featuring beautiful golden-brown spots. It will feel firm but springy when gently pressed. The edges may puff slightly, and you might see a little melted cheese trying to peek out (a good sign!).
- Keep Warm: Transfer cooked pupusas to a plate lined with a clean kitchen towel or covered loosely with foil. Keep them stacked to retain warmth and moisture while you cook the rest. Avoid overcrowding the comal.
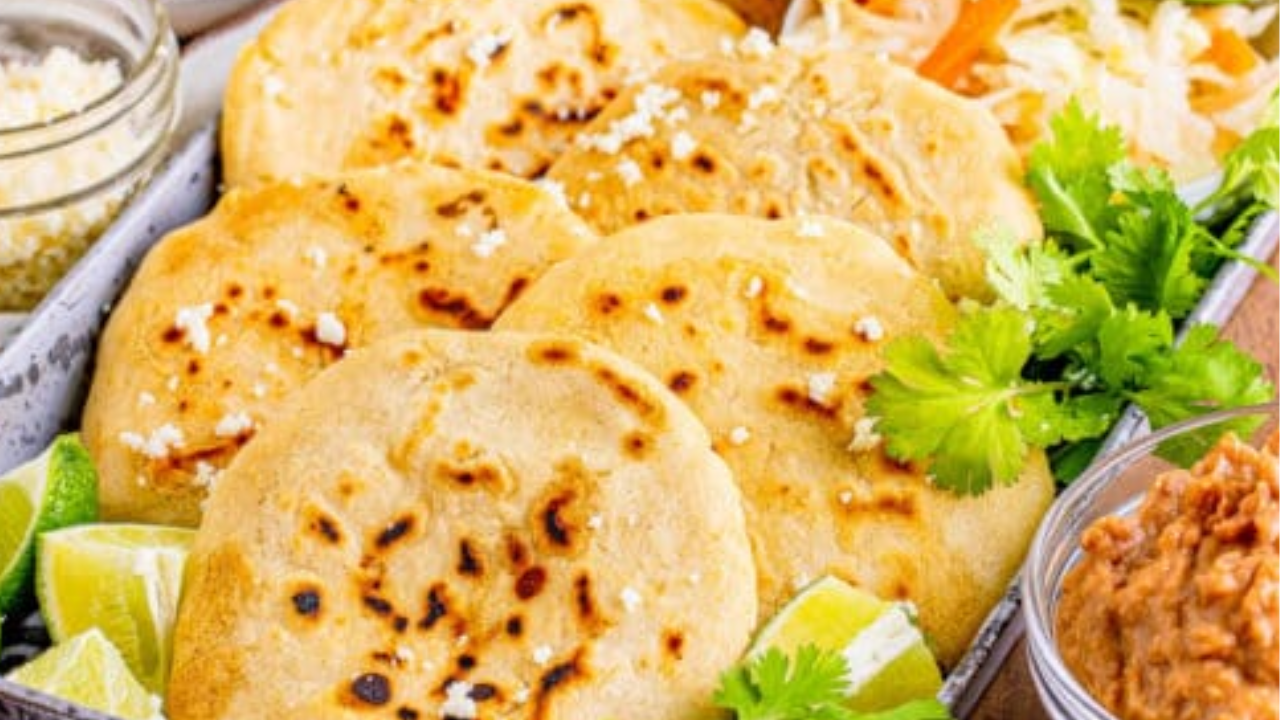
Serving Your Loroco Pupusa: The Essential Companions
An authentic loroco pupusa experience is incomplete without its traditional accompaniments:
- Curtido: This tangy, lightly fermented cabbage slaw is non-negotiable!
- Quick Curtido Recipe: Thinly shred 1/2 small green cabbage and 1 small carrot. Thinly slice 1/2 small onion. Place in a bowl. Bring 1 cup white vinegar, 1/2 cup water, 1 tsp salt, 1/2 tsp dried oregano (optional), and 1 tsp sugar to a simmer. Pour hot liquid over veggies. Stir in 1-2 tbsp chopped cilantro. Let cool, then refrigerate for at least 1 hour (better overnight).
- Salsa Roja (Tomato Sauce): A simple, smooth, slightly cooked tomato sauce.
- Simple Salsa: Blend 4-5 ripe tomatoes (or 1 can fire-roasted tomatoes), 1/2 small onion, 1 clove garlic, 1/4 cup water. Simmer in a pot for 10-15 mins with salt to taste. Optional: Add a pinch of cumin or a small piece of green bell pepper while simmering. Cool before serving.
- How to Serve: Place 1-2 hot pupusas on a plate. Generously top with curtido and spoon salsa roja over the top or on the side. Eat immediately!
- Perfect Pairings: Serve with cold Horchata (rice milk drink), Refresco de Tamarindo (tamarind drink), or a simple Salvadoran coffee.
Variations & Tips for Success
- Mix it Up (Revuelta Style): Add 1/4 cup of well-mashed, cooled refried beans to your loroco-cheese filling for a “loroco revuelta” pupusa.
- Vegan Loroco Pupusa: Use a vegan mozzarella shred (like Miyoko’s or Violife) combined with crumbled firm tofu (pressed well) seasoned with nutritional yeast and salt. Ensure your masa harina is certified vegan.
- Gluten-Free: Masa harina is naturally gluten-free! Just ensure all other ingredients (like pre-shredded cheese blends) are GF certified.
- Avoid Common Mistakes:
- Overfilling: Leads to bursting during cooking.
- Dry Masa: Causes cracking during shaping/cooking. Knead well and hydrate properly.
- Insufficient Heat: Results in dense, gummy pupusas instead of crisp outside/tender inside.
- Rushing the Rest: Letting the masa rest ensures pliability.
- Pressing Too Thin: Makes sealing difficult and prone to leaks.
Conclusion: Your Salvadoran Culinary Adventure Awaits
There you have it – the path to creating truly authentic, delicious loroco pupusa right in your own kitchen. Yes, it takes a little practice to master the seal, and sourcing loroco might require a trip to a specialty store, but the reward is immense. The combination of fresh corn masa, creamy-salty cheese, and the unique, fragrant loroco is a flavor journey unlike any other. Don’t be discouraged if your first pupusa isn’t perfect; embrace the process! The aroma filling your kitchen, the satisfying sizzle, and that first perfect bite make it all worthwhile.
❓ Loroco Pupusa FAQs
- Q: What does loroco taste like?
- A: It’s unique! Think a blend of mild green vegetables (like asparagus or green beans) with subtle floral notes (hints of jasmine or magnolia) and a very faint peppery finish. Cooking mellows its flavor beautifully.
- Q: Can I freeze loroco pupusas?
- A: Yes! Cook them completely and let them cool completely. Place in a single layer on a baking sheet to freeze solid, then transfer to freezer bags, squeezing out air. Freeze for up to 2 months. Reheat from frozen: Thaw slightly, then warm in a skillet over medium-low heat until heated through, or bake at 350°F (175°C) for 10-15 mins.
- Q: Where can I buy loroco outside Central America?
- A: Check well-stocked Latin American grocery stores, especially Salvadoran or Honduran markets. Look in the freezer section (best option) or canned goods aisle. Online Latin food retailers also often carry frozen or canned loroco.
- Q: Is pupusa dough the same as tortilla dough?
- A: They both use masa harina and water, but pupusa dough is typically less hydrated and kneaded longer than tortilla dough. This makes it sturdier for holding fillings without tearing. Tortilla dough is usually softer and more pliable for rolling thin.
- Q: Are loroco pupusas vegetarian?
- A: Traditionally, yes! The classic filling is loroco and cheese (quesillo or queso fresco). Just ensure the specific cheese you use is vegetarian (some use animal rennet). To become vegan, see the variation section above. The masa is naturally vegetarian/vegan.